Mac安装oh-my-zsh

Mac安装oh-my-zsh,可以提升Mac终端使用便利性,自动提示可以忽略大小写,安装官方教材如下:

https://ohmyz.sh/

目录

一、安装Ohmyzsh

1、执行命令:

2、手动安装

二、配置主题

三、配置插件

1、增加高亮插件zsh-syntax-highlighting

2、增加自动提示插件zsh-autosuggestions

四、推荐命令行工具

1、iterm2

2、hyper

官网:

Oh My Zsh - a delightful & open source framework for Zsh
https://ohmyz.sh/

一、安装Ohmyzsh

官网安装教程:Oh My Zsh - a delightful & open source framework for Zshzz
Oh-My-Zsh is a delightful, open source, community-driven framework for managing your ZSH configuration.
https://ohmyz.sh/#install

需要能连接到github(解决git clone超时问题见:

https://blog.csdn.net/CaptainJava/article/details/121119176

1、执行命令:

sh -c "$(curl -fsSL https://raw.github.com/ohmyzsh/ohmyzsh/master/tools/install.sh)"

2、手动安装

如果链接不到这个网址 可以通过浏览器打开这个地址,把内容报错下来,或者复制一下内容报错为install.sh:

#!/bin/sh
#
# This script should be run via curl:
#   sh -c "$(curl -fsSL https://raw.githubusercontent.com/ohmyzsh/ohmyzsh/master/tools/install.sh)"
# or via wget:
#   sh -c "$(wget -qO- https://raw.githubusercontent.com/ohmyzsh/ohmyzsh/master/tools/install.sh)"
# or via fetch:
#   sh -c "$(fetch -o - https://raw.githubusercontent.com/ohmyzsh/ohmyzsh/master/tools/install.sh)"
#
# As an alternative, you can first download the install script and run it afterwards:
#   wget https://raw.githubusercontent.com/ohmyzsh/ohmyzsh/master/tools/install.sh
#   sh install.sh
#
# You can tweak the install behavior by setting variables when running the script. For
# example, to change the path to the Oh My Zsh repository:
#   ZSH=~/.zsh sh install.sh
#
# Respects the following environment variables:
#   ZSH     - path to the Oh My Zsh repository folder (default: $HOME/.oh-my-zsh)
#   REPO    - name of the GitHub repo to install from (default: ohmyzsh/ohmyzsh)
#   REMOTE  - full remote URL of the git repo to install (default: GitHub via HTTPS)
#   BRANCH  - branch to check out immediately after install (default: master)
#
# Other options:
#   CHSH       - 'no' means the installer will not change the default shell (default: yes)
#   RUNZSH     - 'no' means the installer will not run zsh after the install (default: yes)
#   KEEP_ZSHRC - 'yes' means the installer will not replace an existing .zshrc (default: no)
#
# You can also pass some arguments to the install script to set some these options:
#   --skip-chsh: has the same behavior as setting CHSH to 'no'
#   --unattended: sets both CHSH and RUNZSH to 'no'
#   --keep-zshrc: sets KEEP_ZSHRC to 'yes'
# For example:
#   sh install.sh --unattended
# or:
#   sh -c "$(curl -fsSL https://raw.githubusercontent.com/ohmyzsh/ohmyzsh/master/tools/install.sh)" "" --unattended
#
set -e
 
# Track if $ZSH was provided
custom_zsh=${ZSH:+yes}
 
# Default settings
ZSH=${ZSH:-~/.oh-my-zsh}
REPO=${REPO:-ohmyzsh/ohmyzsh}
REMOTE=${REMOTE:-https://github.com/${REPO}.git}
BRANCH=${BRANCH:-master}
 
# Other options
CHSH=${CHSH:-yes}
RUNZSH=${RUNZSH:-yes}
KEEP_ZSHRC=${KEEP_ZSHRC:-no}
 
 
command_exists() {
  command -v "$@" >/dev/null 2>&1
}
 
# The [ -t 1 ] check only works when the function is not called from
# a subshell (like in `$(...)` or `(...)`, so this hack redefines the
# function at the top level to always return false when stdout is not
# a tty.
if [ -t 1 ]; then
  is_tty() {
    true
  }
else
  is_tty() {
    false
  }
fi
 
# This function uses the logic from supports-hyperlinks[1][2], which is
# made by Kat Marchán (@zkat) and licensed under the Apache License 2.0.
# [1] https://github.com/zkat/supports-hyperlinks
# [2] https://crates.io/crates/supports-hyperlinks
#
# Copyright (c) 2021 Kat Marchán
#
# Licensed under the Apache License, Version 2.0 (the "License");
# you may not use this file except in compliance with the License.
# You may obtain a copy of the License at
#
#     http://www.apache.org/licenses/LICENSE-2.0
#
# Unless required by applicable law or agreed to in writing, software
# distributed under the License is distributed on an "AS IS" BASIS,
# WITHOUT WARRANTIES OR CONDITIONS OF ANY KIND, either express or implied.
# See the License for the specific language governing permissions and
# limitations under the License.
supports_hyperlinks() {
  # $FORCE_HYPERLINK must be set and be non-zero (this acts as a logic bypass)
  if [ -n "$FORCE_HYPERLINK" ]; then
    [ "$FORCE_HYPERLINK" != 0 ]
    return $?
  fi
 
  # If stdout is not a tty, it doesn't support hyperlinks
  is_tty || return 1
 
  # DomTerm terminal emulator (domterm.org)
  if [ -n "$DOMTERM" ]; then
    return 0
  fi
 
  # VTE-based terminals above v0.50 (Gnome Terminal, Guake, ROXTerm, etc)
  if [ -n "$VTE_VERSION" ]; then
    [ $VTE_VERSION -ge 5000 ]
    return $?
  fi
 
  # If $TERM_PROGRAM is set, these terminals support hyperlinks
  case "$TERM_PROGRAM" in
  Hyper|iTerm.app|terminology|WezTerm) return 0 ;;
  esac
 
  # kitty supports hyperlinks
  if [ "$TERM" = xterm-kitty ]; then
    return 0
  fi
 
  # Windows Terminal or Konsole also support hyperlinks
  if [ -n "$WT_SESSION" ] || [ -n "$KONSOLE_VERSION" ]; then
    return 0
  fi
 
  return 1
}
 
fmt_link() {
  # $1: text, $2: url, $3: fallback mode
  if supports_hyperlinks; then
    printf '\033]8;;%s\a%s\033]8;;\a\n' "$2" "$1"
    return
  fi
 
  case "$3" in
  --text) printf '%s\n' "$1" ;;
  --url|*) fmt_underline "$2" ;;
  esac
}
 
fmt_underline() {
  is_tty && printf '\033[4m%s\033[24m\n' "$*" || printf '%s\n' "$*"
}
 
# shellcheck disable=SC2016 # backtick in single-quote
fmt_code() {
  is_tty && printf '`\033[2m%s\033[22m`\n' "$*" || printf '`%s`\n' "$*"
}
 
fmt_error() {
  printf '%sError: %s%s\n' "$BOLD$RED" "$*" "$RESET" >&2
}
 
setup_color() {
  # Only use colors if connected to a terminal
  if is_tty; then
    RAINBOW="
      $(printf '\033[38;5;196m')
      $(printf '\033[38;5;202m')
      $(printf '\033[38;5;226m')
      $(printf '\033[38;5;082m')
      $(printf '\033[38;5;021m')
      $(printf '\033[38;5;093m')
      $(printf '\033[38;5;163m')
    "
    RED=$(printf '\033[31m')
    GREEN=$(printf '\033[32m')
    YELLOW=$(printf '\033[33m')
    BLUE=$(printf '\033[34m')
    BOLD=$(printf '\033[1m')
    RESET=$(printf '\033[m')
  else
    RAINBOW=""
    RED=""
    GREEN=""
    YELLOW=""
    BLUE=""
    BOLD=""
    RESET=""
  fi
}
 
setup_ohmyzsh() {
  # Prevent the cloned repository from having insecure permissions. Failing to do
  # so causes compinit() calls to fail with "command not found: compdef" errors
  # for users with insecure umasks (e.g., "002", allowing group writability). Note
  # that this will be ignored under Cygwin by default, as Windows ACLs take
  # precedence over umasks except for filesystems mounted with option "noacl".
  umask g-w,o-w
 
  echo "${BLUE}Cloning Oh My Zsh...${RESET}"
 
  command_exists git || {
    fmt_error "git is not installed"
    exit 1
  }
 
  ostype=$(uname)
  if [ -z "${ostype%CYGWIN*}" ] && git --version | grep -q msysgit; then
    fmt_error "Windows/MSYS Git is not supported on Cygwin"
    fmt_error "Make sure the Cygwin git package is installed and is first on the \$PATH"
    exit 1
  fi
 
  git clone -c core.eol=lf -c core.autocrlf=false \
    -c fsck.zeroPaddedFilemode=ignore \
    -c fetch.fsck.zeroPaddedFilemode=ignore \
    -c receive.fsck.zeroPaddedFilemode=ignore \
    -c oh-my-zsh.remote=origin \
    -c oh-my-zsh.branch="$BRANCH" \
    --depth=1 --branch "$BRANCH" "$REMOTE" "$ZSH" || {
    fmt_error "git clone of oh-my-zsh repo failed"
    exit 1
  }
 
  echo
}
 
setup_zshrc() {
  # Keep most recent old .zshrc at .zshrc.pre-oh-my-zsh, and older ones
  # with datestamp of installation that moved them aside, so we never actually
  # destroy a user's original zshrc
  echo "${BLUE}Looking for an existing zsh config...${RESET}"
 
  # Must use this exact name so uninstall.sh can find it
  OLD_ZSHRC=~/.zshrc.pre-oh-my-zsh
  if [ -f ~/.zshrc ] || [ -h ~/.zshrc ]; then
    # Skip this if the user doesn't want to replace an existing .zshrc
    if [ "$KEEP_ZSHRC" = yes ]; then
      echo "${YELLOW}Found ~/.zshrc.${RESET} ${GREEN}Keeping...${RESET}"
      return
    fi
    if [ -e "$OLD_ZSHRC" ]; then
      OLD_OLD_ZSHRC="${OLD_ZSHRC}-$(date +%Y-%m-%d_%H-%M-%S)"
      if [ -e "$OLD_OLD_ZSHRC" ]; then
        fmt_error "$OLD_OLD_ZSHRC exists. Can't back up ${OLD_ZSHRC}"
        fmt_error "re-run the installer again in a couple of seconds"
        exit 1
      fi
      mv "$OLD_ZSHRC" "${OLD_OLD_ZSHRC}"
 
      echo "${YELLOW}Found old ~/.zshrc.pre-oh-my-zsh." \
        "${GREEN}Backing up to ${OLD_OLD_ZSHRC}${RESET}"
    fi
    echo "${YELLOW}Found ~/.zshrc.${RESET} ${GREEN}Backing up to ${OLD_ZSHRC}${RESET}"
    mv ~/.zshrc "$OLD_ZSHRC"
  fi
 
  echo "${GREEN}Using the Oh My Zsh template file and adding it to ~/.zshrc.${RESET}"
 
  sed "/^export ZSH=/ c\\
export ZSH=\"$ZSH\"
" "$ZSH/templates/zshrc.zsh-template" > ~/.zshrc-omztemp
  mv -f ~/.zshrc-omztemp ~/.zshrc
 
  echo
}
 
setup_shell() {
  # Skip setup if the user wants or stdin is closed (not running interactively).
  if [ "$CHSH" = no ]; then
    return
  fi
 
  # If this user's login shell is already "zsh", do not attempt to switch.
  if [ "$(basename -- "$SHELL")" = "zsh" ]; then
    return
  fi
 
  # If this platform doesn't provide a "chsh" command, bail out.
  if ! command_exists chsh; then
    cat <<EOF
I can't change your shell automatically because this system does not have chsh.
${BLUE}Please manually change your default shell to zsh${RESET}
EOF
    return
  fi
 
  echo "${BLUE}Time to change your default shell to zsh:${RESET}"
 
  # Prompt for user choice on changing the default login shell
  printf '%sDo you want to change your default shell to zsh? [Y/n]%s ' \
    "$YELLOW" "$RESET"
  read -r opt
  case $opt in
    y*|Y*|"") echo "Changing the shell..." ;;
    n*|N*) echo "Shell change skipped."; return ;;
    *) echo "Invalid choice. Shell change skipped."; return ;;
  esac
 
  # Check if we're running on Termux
  case "$PREFIX" in
    *com.termux*) termux=true; zsh=zsh ;;
    *) termux=false ;;
  esac
 
  if [ "$termux" != true ]; then
    # Test for the right location of the "shells" file
    if [ -f /etc/shells ]; then
      shells_file=/etc/shells
    elif [ -f /usr/share/defaults/etc/shells ]; then # Solus OS
      shells_file=/usr/share/defaults/etc/shells
    else
      fmt_error "could not find /etc/shells file. Change your default shell manually."
      return
    fi
 
    # Get the path to the right zsh binary
    # 1. Use the most preceding one based on $PATH, then check that it's in the shells file
    # 2. If that fails, get a zsh path from the shells file, then check it actually exists
    if ! zsh=$(command -v zsh) || ! grep -qx "$zsh" "$shells_file"; then
      if ! zsh=$(grep '^/.*/zsh$' "$shells_file" | tail -1) || [ ! -f "$zsh" ]; then
        fmt_error "no zsh binary found or not present in '$shells_file'"
        fmt_error "change your default shell manually."
        return
      fi
    fi
  fi
 
  # We're going to change the default shell, so back up the current one
  if [ -n "$SHELL" ]; then
    echo "$SHELL" > ~/.shell.pre-oh-my-zsh
  else
    grep "^$USERNAME:" /etc/passwd | awk -F: '{print $7}' > ~/.shell.pre-oh-my-zsh
  fi
 
  # Actually change the default shell to zsh
  if ! chsh -s "$zsh"; then
    fmt_error "chsh command unsuccessful. Change your default shell manually."
  else
    export SHELL="$zsh"
    echo "${GREEN}Shell successfully changed to '$zsh'.${RESET}"
  fi
 
  echo
}
 
# shellcheck disable=SC2183  # printf string has more %s than arguments ($RAINBOW expands to multiple arguments)
print_success() {
  printf '%s         %s__      %s           %s        %s       %s     %s__   %s\n' $RAINBOW $RESET
  printf '%s  ____  %s/ /_    %s ____ ___  %s__  __  %s ____  %s_____%s/ /_  %s\n' $RAINBOW $RESET
  printf '%s / __ \%s/ __ \  %s / __ `__ \%s/ / / / %s /_  / %s/ ___/%s __ \ %s\n' $RAINBOW $RESET
  printf '%s/ /_/ /%s / / / %s / / / / / /%s /_/ / %s   / /_%s(__  )%s / / / %s\n' $RAINBOW $RESET
  printf '%s\____/%s_/ /_/ %s /_/ /_/ /_/%s\__, / %s   /___/%s____/%s_/ /_/  %s\n' $RAINBOW $RESET
  printf '%s    %s        %s           %s /____/ %s       %s     %s          %s....is now installed!%s\n' $RAINBOW $GREEN $RESET
  printf '\n'
  printf '\n'
  printf "%s %s %s\n" "Before you scream ${BOLD}${YELLOW}Oh My Zsh!${RESET} look over the" \
    "$(fmt_code "$(fmt_link ".zshrc" "file://$HOME/.zshrc" --text)")" \
    "file to select plugins, themes, and options."
  printf '\n'
  printf '%s\n' "• Follow us on Twitter: $(fmt_link @ohmyzsh https://twitter.com/ohmyzsh)"
  printf '%s\n' "• Join our Discord community: $(fmt_link "Discord server" https://discord.gg/ohmyzsh)"
  printf '%s\n' "• Get stickers, t-shirts, coffee mugs and more: $(fmt_link "Planet Argon Shop" https://shop.planetargon.com/collections/oh-my-zsh)"
  printf '%s\n' $RESET
}
 
main() {
  # Run as unattended if stdin is not a tty
  if [ ! -t 0 ]; then
    RUNZSH=no
    CHSH=no
  fi
 
  # Parse arguments
  while [ $# -gt 0 ]; do
    case $1 in
      --unattended) RUNZSH=no; CHSH=no ;;
      --skip-chsh) CHSH=no ;;
      --keep-zshrc) KEEP_ZSHRC=yes ;;
    esac
    shift
  done
 
  setup_color
 
  if ! command_exists zsh; then
    echo "${YELLOW}Zsh is not installed.${RESET} Please install zsh first."
    exit 1
  fi
 
  if [ -d "$ZSH" ]; then
    echo "${YELLOW}The \$ZSH folder already exists ($ZSH).${RESET}"
    if [ "$custom_zsh" = yes ]; then
      cat <<EOF
You ran the installer with the \$ZSH setting or the \$ZSH variable is
exported. You have 3 options:
1. Unset the ZSH variable when calling the installer:
   $(fmt_code "ZSH= sh install.sh")
2. Install Oh My Zsh to a directory that doesn't exist yet:
   $(fmt_code "ZSH=path/to/new/ohmyzsh/folder sh install.sh")
3. (Caution) If the folder doesn't contain important information,
   you can just remove it with $(fmt_code "rm -r $ZSH")
EOF
    else
      echo "You'll need to remove it if you want to reinstall."
    fi
    exit 1
  fi
 
  setup_ohmyzsh
  setup_zshrc
  setup_shell
 
  print_success
 
  if [ $RUNZSH = no ]; then
    echo "${YELLOW}Run zsh to try it out.${RESET}"
    exit
  fi
 
  exec zsh -l
}
 
main "$@"

然后给install.sh文件赋可执行权限

chmod +x install.sh

执行安装:

./install.sh

二、配置主题

自带主题示例:

https://github.com/ohmyzsh/ohmyzsh/wiki/Themes

默认主题目录:~/.oh-my-zsh/themes
自定义主题目录:~/.oh-my-zsh/custom/themes

自定义插件优先加载,如果没有再加载默认目录中的主题,建议自己下载的主题下载到自定义目录中

自带主题所在目录:

~/.oh-my-zsh/themes

设置方法:

修改配置文件

~/.zshrc

修改内容如下:

# 默认主题
# ZSH_THEME="robbyrussell"
# 随机主题
#ZSH_THEME="random"
 
ZSH_THEME="cloud"

也可以设置随机主题,每次开启窗口或者source是会自动切换,设置方式如下:

ZSH_THEME="random"

切换后会提示当前使用主题,如:

[oh-my-zsh] Random theme 'cloud' loaded

三、配置插件
说明:

默认插件目录:~/.oh-my-zsh/plugins
自定义插件目录:~/.oh-my-zsh/custom/plugins

自定义插件优先加载,如果没内有在加载默认目录中的插件,建议自己下载的插件下载到自定义目录中

以下插件可以通过手动git clone至插件目录或者通过一下命令

1、增加高亮插件zsh-syntax-highlighting

git clone https://github.com/zsh-users/zsh-syntax-highlighting.git ${ZSH_CUSTOM:-~/.oh-my-zsh/custom}/plugins/zsh-syntax-highlighting

修改~/.zshrc文件中配置:(插件间加空格)

plugins=(其他的插件 zsh-syntax-highlighting)
2、增加自动提示插件zsh-autosuggestions

git clone https://github.com/zsh-users/zsh-autosuggestions $ZSH_CUSTOM/plugins/zsh-autosuggestions

修改~/.zshrc文件中配置:

plugins=(其他的插件 zsh-autosuggestions)

最终:

plugins=(git zsh-autosuggestions zsh-syntax-highlighting per-directory-history command-not-found safe-paste history-substring-search)

插件推荐:mac上使用oh my zsh有哪些必备的插件推荐? - 知乎

四、推荐命令行工具

1、iterm2
2、hyper

Hyper™
A terminal built on web technologies
https://hyper.is/

Link: (mac安装ohmyzsh)[https://blog.csdn.net/CaptainJava/article/details/121117458]
优化在 SwiftUI List 中显示大数据集的响应效率

拥有优秀的交互效果和手感,是很多 iOS 开发者长久以来坚守的原则。同样一段代码,在不同数据量级下的响应表现可能会有云泥之别。本文将通过一个优化列表视图的案例,展现在 SwiftUI 中查找问题、解决问题的思路,其中也会对 SwiftUI 视图的显式标识、@FetchRequest 的动态设置、List 的运作机制等内容有所涉及。本文的范例需运行在 iOS 15 及以上系统,技术特性也以 SwiftUI 3.0 为基础。

首先创建一个假设性的需求:

  • 一个可以展示数万条记录的视图
  • 从上个视图进入该视图时不应有明显延迟
  • 可以一键到达数据的顶部或底部且没有响应延迟

响应迟钝的列表视图

通常会考虑采用如下的步骤以实现上面的要求:

  • 创建数据集
  • 通过 List 展示数据集
  • 用 ScrollViewReader 对 List 进行包裹
  • 给 List 中的 item 添加 id 标识,用于定位
  • 通过 scrollTo 滚动到指定的位置(顶部或底部)

下面的代码便是按照此思路来实现的:

struct ContentView: View {
    var body: some View {
        NavigationView {
            List {
                // 通过一个 NavigationView 进入列表视图
                NavigationLink("包含 40000 条数据的列表视图", destination: ListEachRowHasID())
            }
        }
    }
}

struct ListEachRowHasID: View {
    // 数据通过 CoreData 创建。创建了 40000 条演示数据。Item 的结构非常简单,记录容量很小。
    @FetchRequest(
        sortDescriptors: [NSSortDescriptor(keyPath: \Item.timestamp, ascending: true)],
        animation: .default
    )
    private var items: FetchedResults<Item>

    var body: some View {
        ScrollViewReader { proxy in
            VStack {
                HStack {
                    Button("Top") {
                        withAnimation {
                            // 滚动到列表最上面的记录
                            proxy.scrollTo(items.first?.objectID, anchor: .center)
                        }
                    }.buttonStyle(.bordered)
                    Button("Bottom") {
                        withAnimation {
                            // 滚动到列表最下面的记录
                            proxy.scrollTo(items.last?.objectID)
                        }
                    }.buttonStyle(.bordered)
                }
                List {
                    ForEach(items) { item in
                        ItemRow(item: item)
                            // 给每行记录视图设置标识
                            .id(item.objectID)
                    }
                }
            }
        }
    }
}

struct ItemRow: View {
    let item: Item
    var body: some View {
        Text(item.timestamp, format: .dateTime)
            .frame(minHeight: 40)
    }
}
// 满足 ForEach 的 Identifiable 需求
extension Item: Identifiable {}
本文中的 全部源代码可以在此处获取

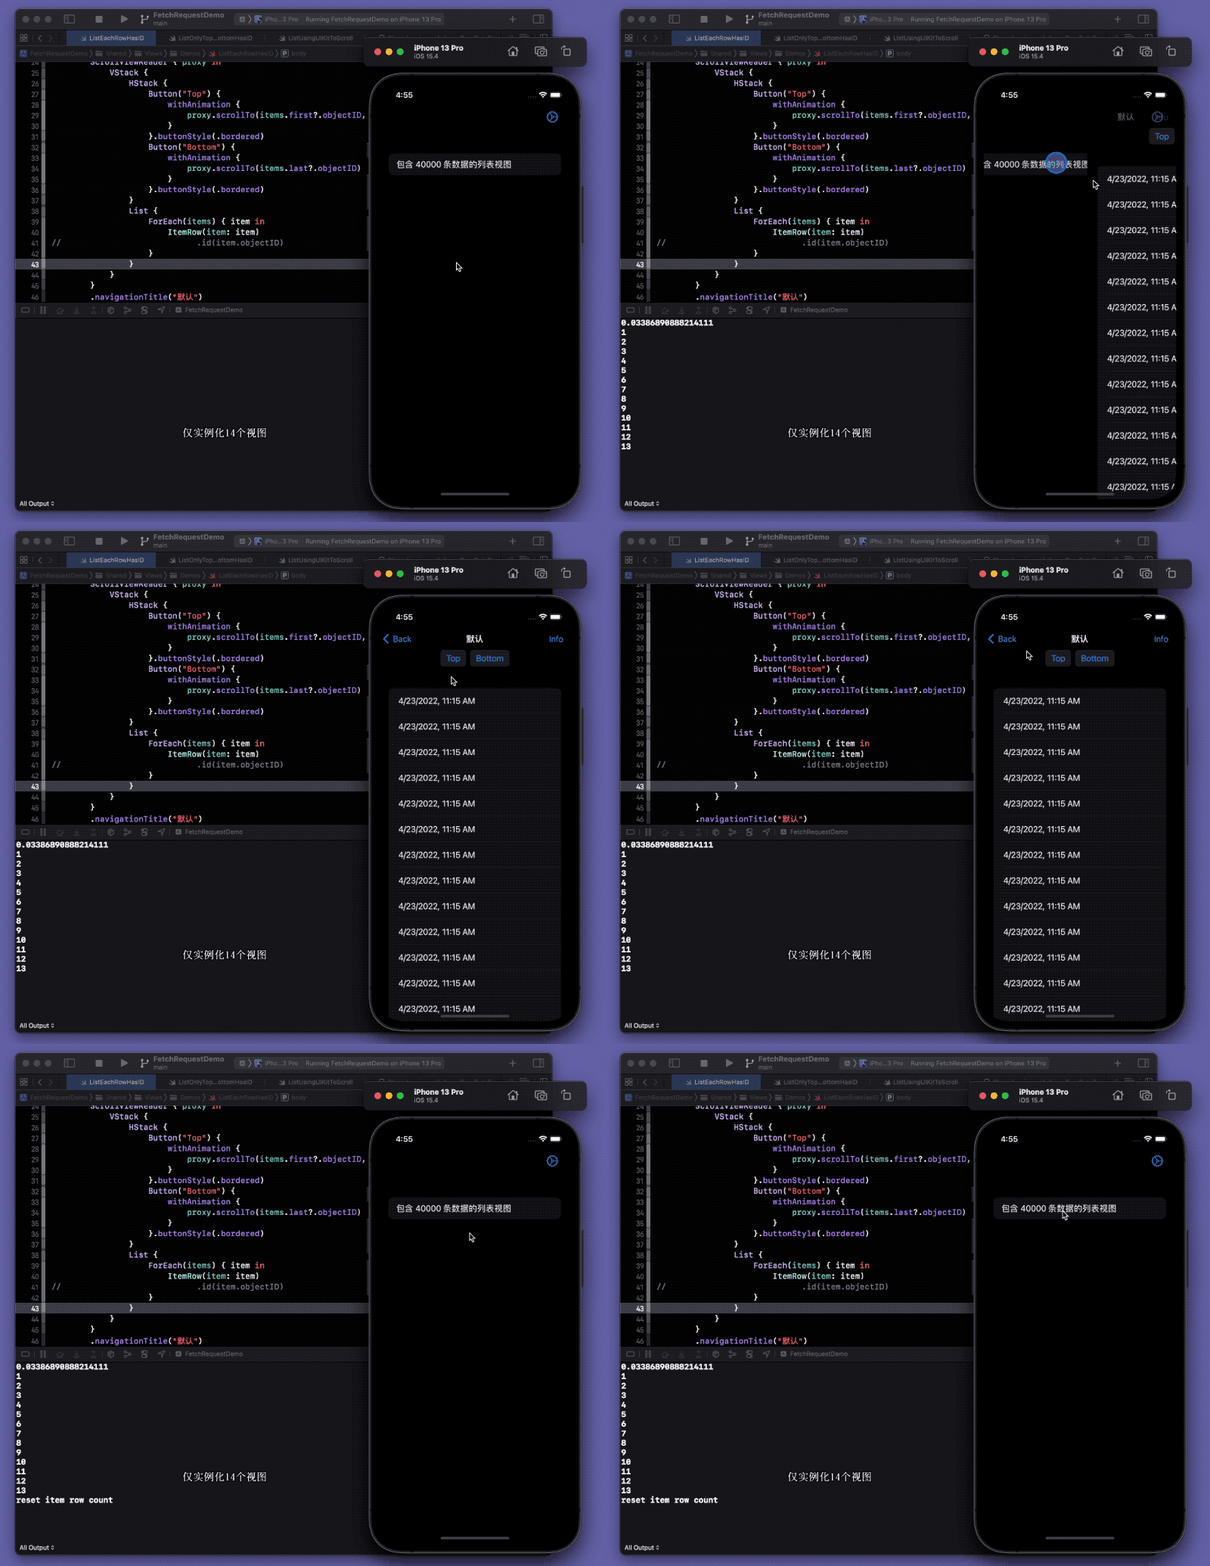
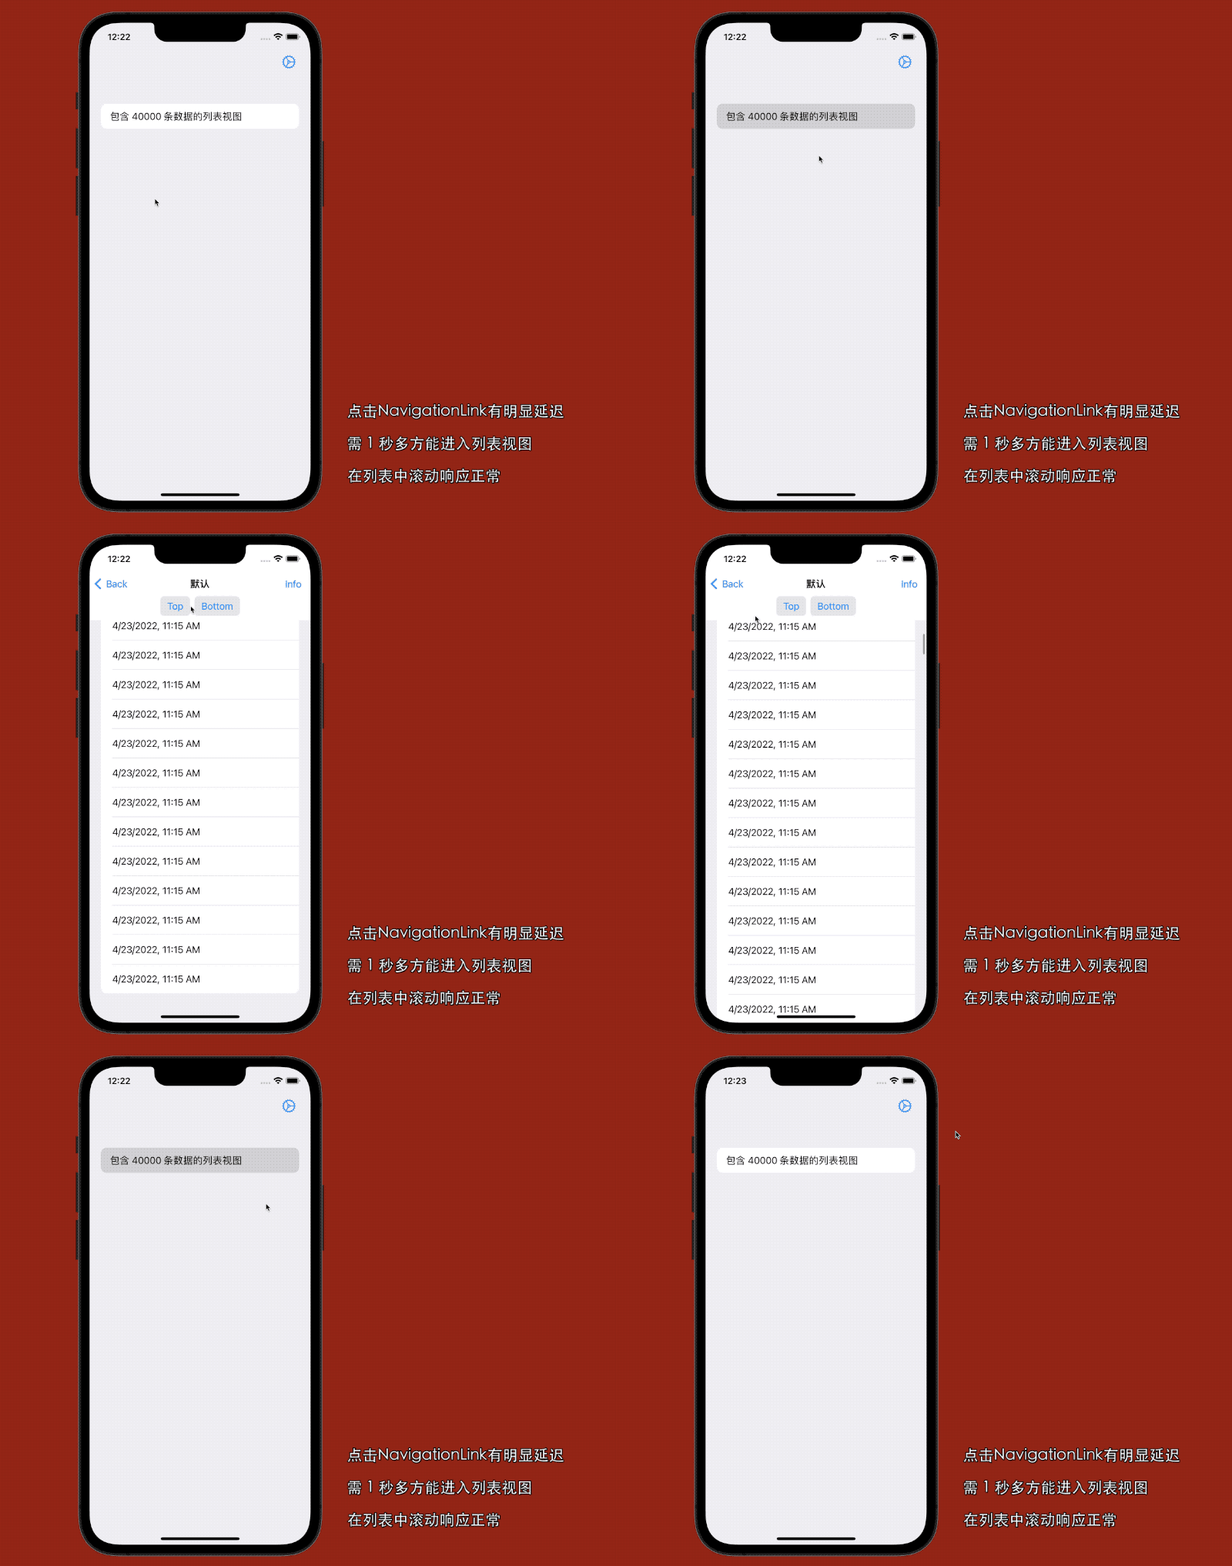
在只拥有数百条记录的情况下,上面的代码运行的效果非常良好,但在创建了 40000 条演示数据后,该视图的响应状况如下:

id<em>delay</em>demo<em>2022-04-23 12.22.44.2022-04-23 12</em>29_07

进入视图的时候有明显的卡顿(1 秒多钟),进入后列表滚动流畅且可无延迟的响应滚动到列表底部或顶部的指令。

找寻问题原因

或许有人会认为,毕竟数据量较大,进入列表视图有一定的延迟是正常的。但即使在 SwiftUI 的效能并非十分优秀的今天,我们仍然可以做到以更小的卡顿进入一个数倍于当面数据量的列表视图。

考虑到当前的卡顿出现在进入视图的时刻,我们可以将查找问题的关注点集中在如下几个方面:

  • Core Data 的性能( IO 或 惰值填充 )
  • 列表视图的初始化或 body 求值
  • List 的效能

Core Data 的性能

@FetchRequest 是 NSFetchedResultsController 的 SwiftUI 包装。它会根据指定的 NSFetchReqeust ,自动响应数据的变化并刷新视图。上面的代码对应的 NSFetchRequest 如下:

@FetchRequest(
        sortDescriptors: [NSSortDescriptor(keyPath: \Item.timestamp, ascending: true)],
        animation: .default
    )
private var items: FetchedResults<Item>

// 等效的 NSFetchRequest
extension Item {
    static var fetchRequest:NSFetchRequest<Item> {
        let fetchRequest = NSFetchRequest<Item>(entityName: "Item")
        fetchRequest.sortDescriptors = [NSSortDescriptor(keyPath: \Item.timestamp, ascending: true)]
        return fetchRequest
    }
}

// 相当于
@FetchRequest(fetchRequest: Item.fetchRequest, animation: .default)
var items:FetchedResults<Item>

此时 fetchRequest 的 returnsObjectsAsFaults 为默认值 false (托管对象为惰值状态),fetchBatchSize 没有设置 (会将所有数据加载到持久化存储的行缓冲区)。

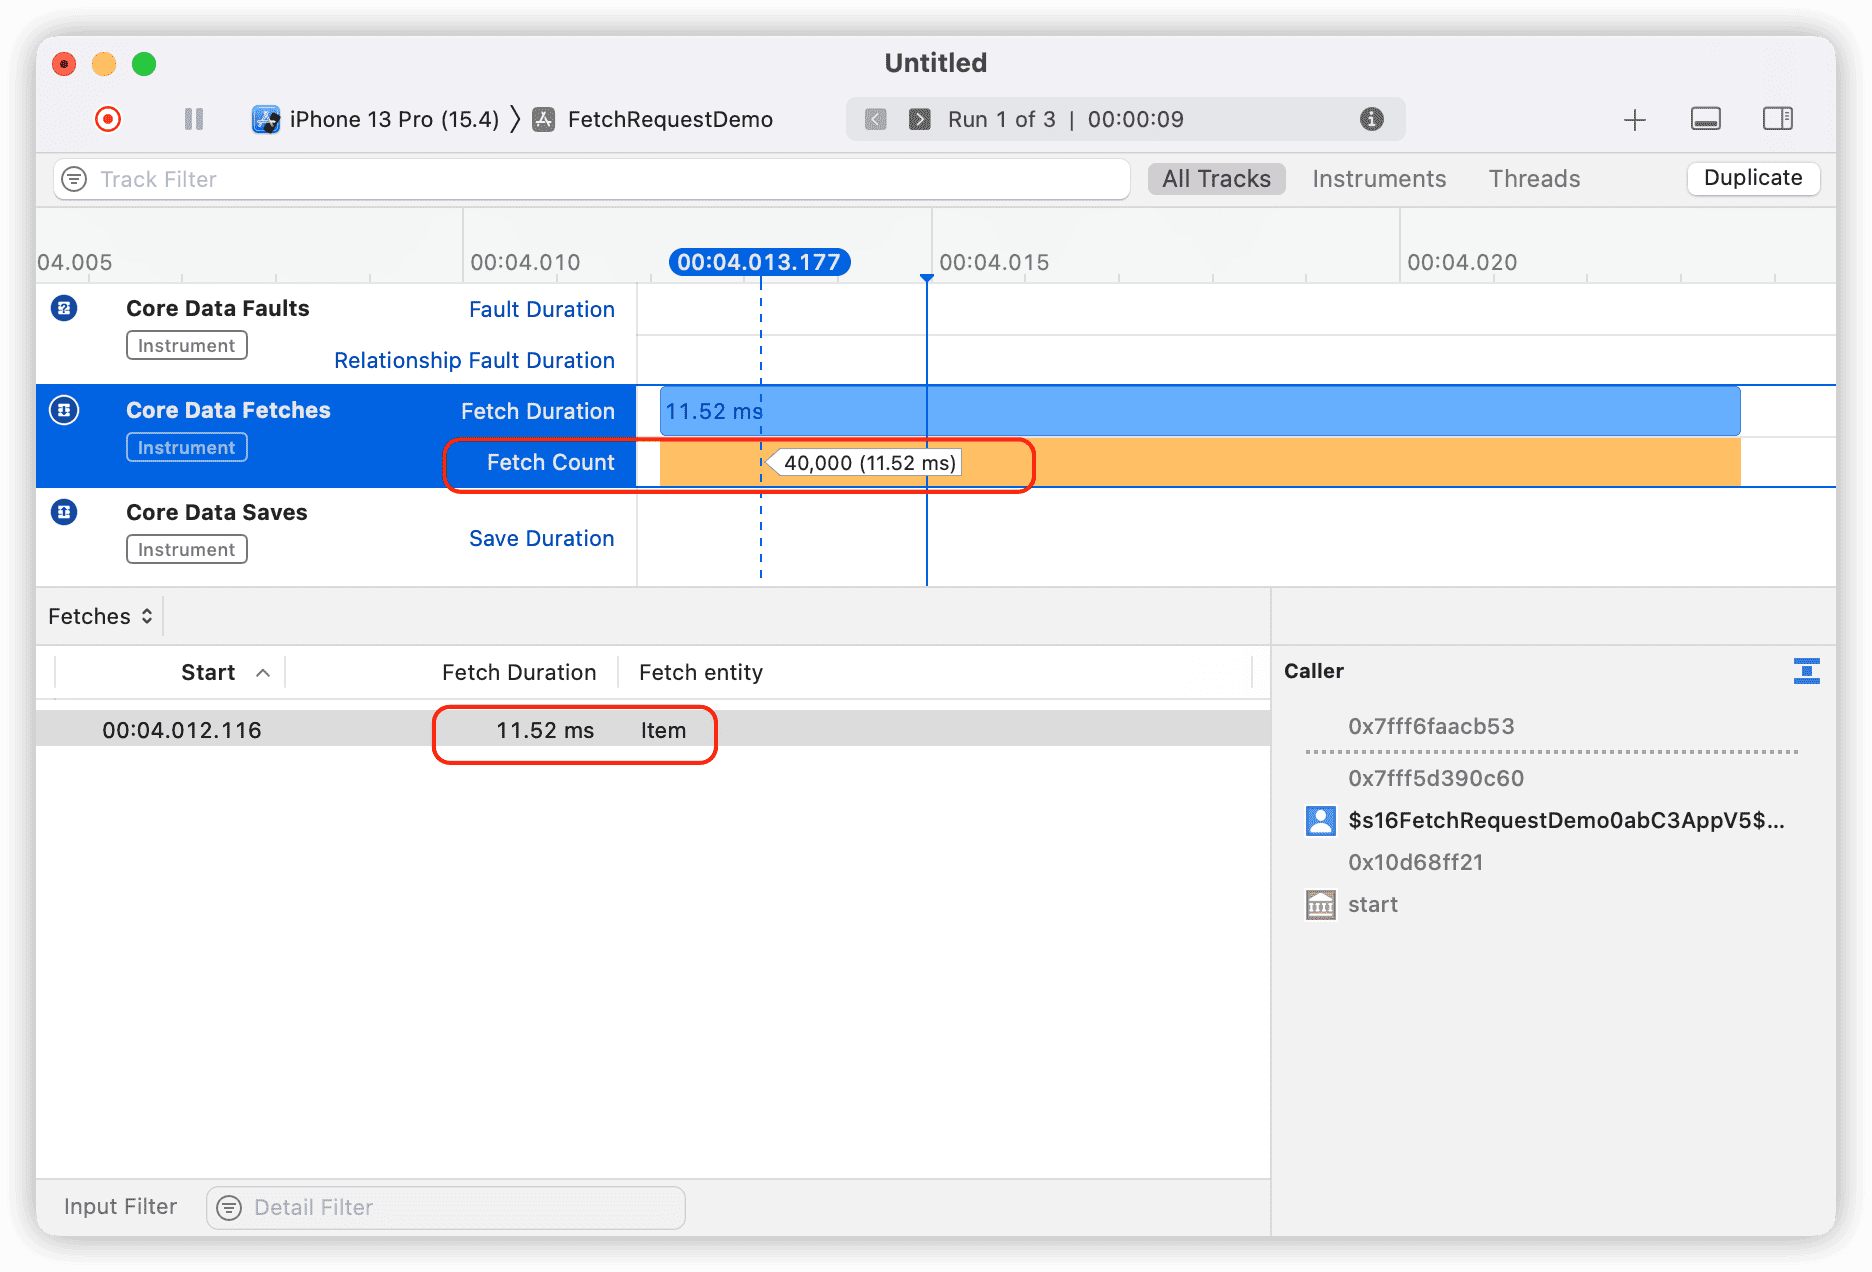
通过使用 Instruments 得知,即便使用当前没有进行优化的 fetchRequest , 从数据库中将 40000 条记录加载到持久化存储的行缓冲所用的时间也只有 11ms 左右。

image-20220423145552324

另外,通过下面的代码也可以看到仅有 10 余个托管对象( 显示屏幕高度所需的数据 )进行了惰值化填充:

func info() -> some View {
    let faultCount = items.filter { $0.isFault }.count
    return VStack {
        Text("item's count: \(items.count)")
        Text("fault item's count : \(faultCount)")
    }
}

image-20220425075620588

因此可以排除卡顿是由于 Core Data 的原因所导致的。

列表视图的初始化和 body 求值

如果对 SwiftUI 的 NavigationView 有一定了解的话,应该知道 SwiftUI 会对 NavigationLink 的目标视图进行预实例化(但不会对 body 求值)。也就是当显示主界面菜单时,列表视图已经完成了实例的创建(可以通过在 ListEachRowHasID 的构造函数中添加打印命令得以证明),因此也不应是实例化列表视图导致的延迟。

通过检查 ListEachRowHasID 的 body 的求值消耗时间,也没有发现任何的效率问题。

    var body: some View {
        let start = Date()
        ScrollViewReader { proxy in
            VStack {
                ....
            }
        }
        let _ = print(Date().timeIntervalSince(start))
    }
// 0.0004889965057373047

目前已经可以基本排除性能问题来源于 IO、数据库、列表视图实例化等因素,那么有极大的可能源自 SwiftUI 的内部处理机制。

List 的效能

List 作为 SwiftUI 对 UITableView ( NSTableView )的封装,大多数情况下它的性能都比较令人满意。在 SwiftUI 视图的生命周期研究 一文中,我对 List 如何对子视图的显示进行优化做了一定的介绍。按照正常的逻辑,当进入列表视图 ListEachRowHasID 后 List 只应该实例化十几个 ItemRow 子视图 ( 按屏幕的显示需要 ),即便使用 scrollTo 滚动到列表底部,List 也会对滚动过程进行显示优化,滚动过程中至多实例化 100 多个 ItemRow 。

我们对 ItemRow 进行一定的修改以验证上述假设:

struct ItemRow:View{
    static var count = 0
    let item:Item
    init(item:Item){
        self.item = item
        Self.count += 1
        print(Self.count)
    }
    var body: some View{
//        let _ = print("get body value")
        Text(item.timestamp, format: .dateTime)
            .frame(minHeight:40)
    }
}

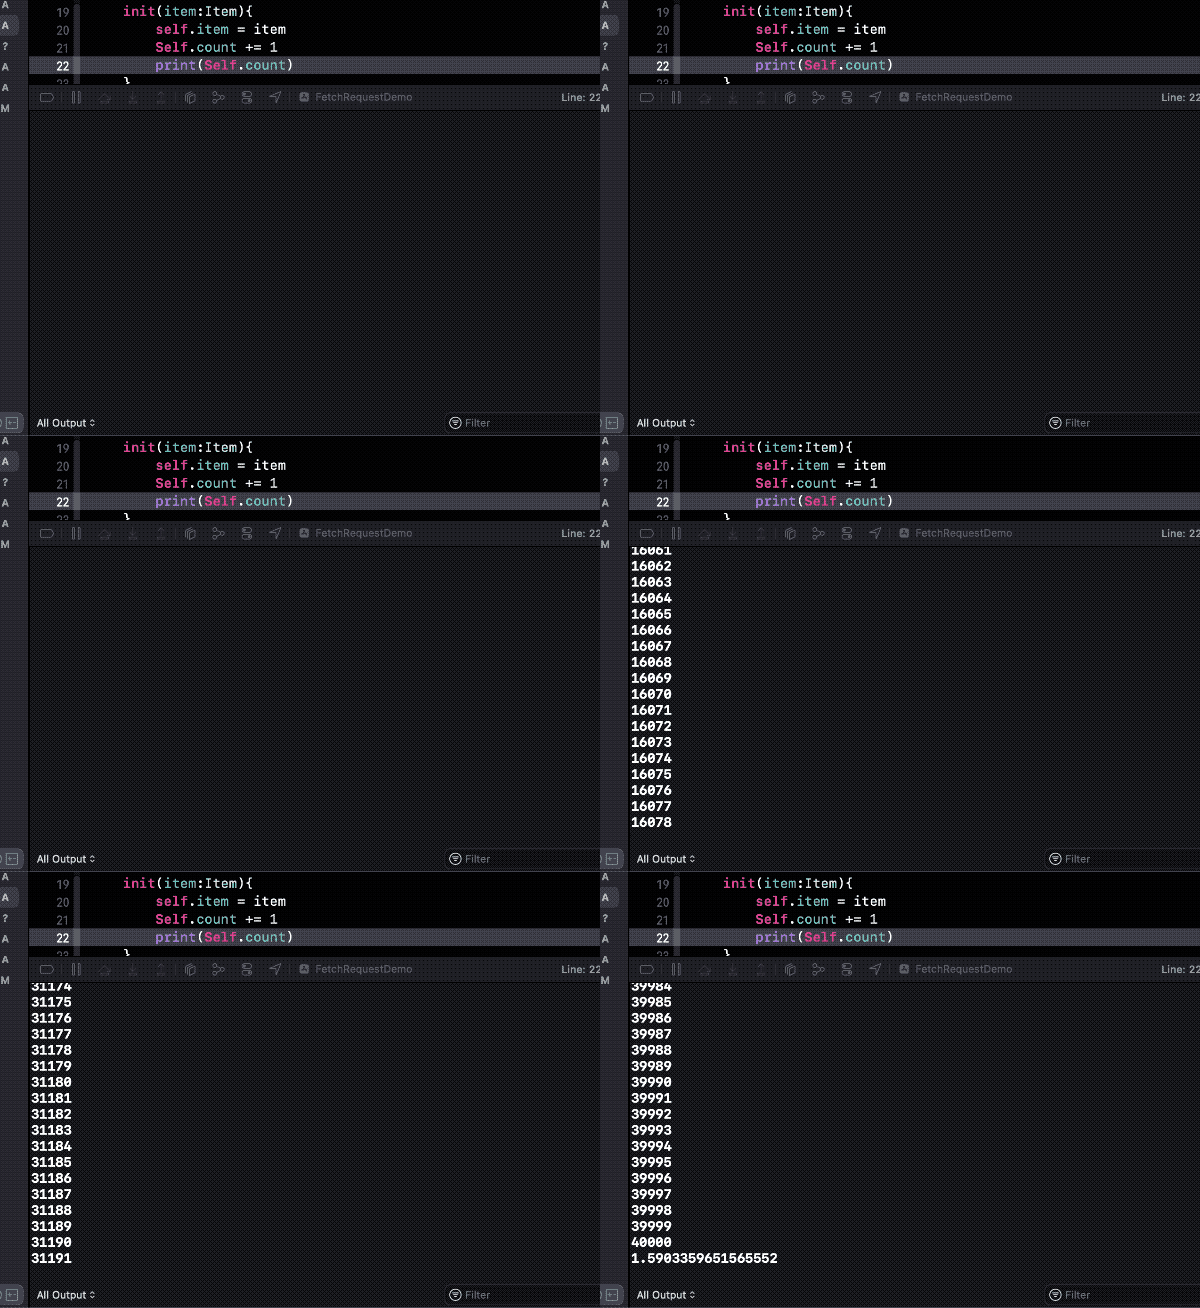
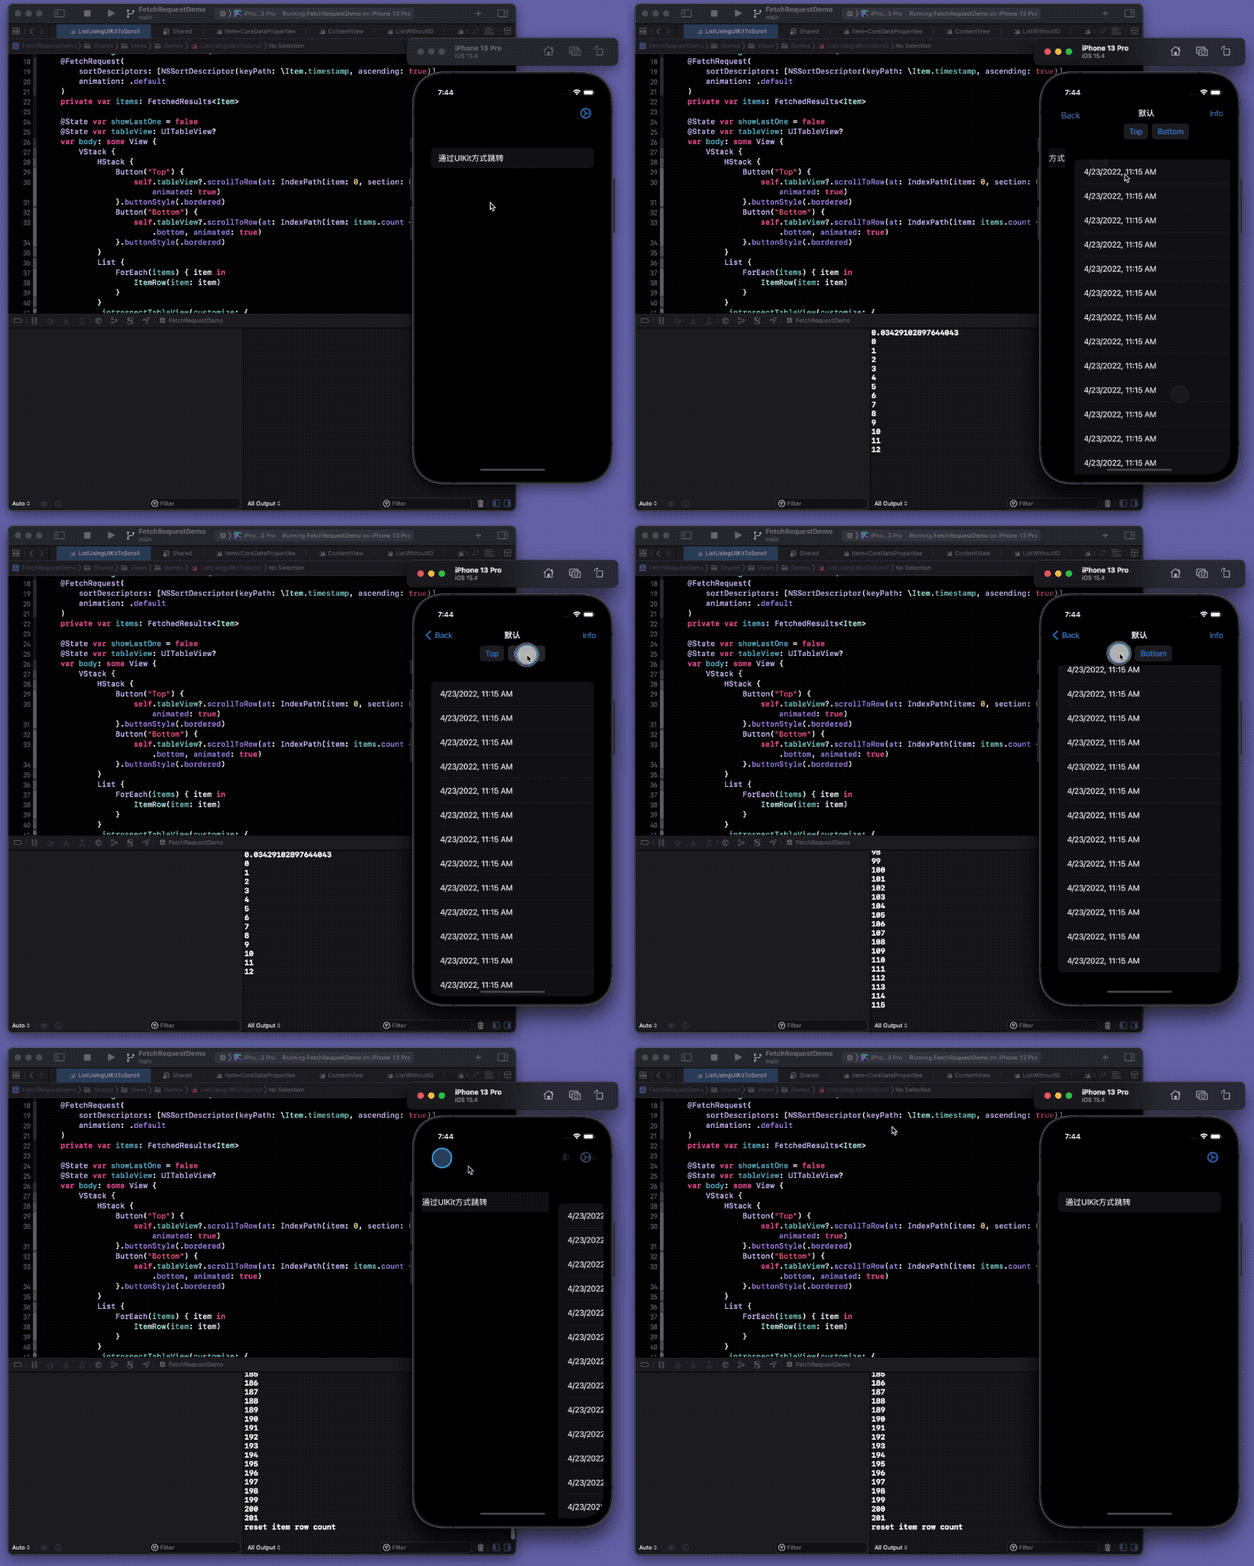
重新运行,再次进入列表视图,我们竟然得到了如下的结果:

itemRow<em>count</em>2022-04-23<em>16.39.41.2022-04-23 16</em>40_53

List 将所有数据的 itemRow 都进行了实例化,一共 40000 个。这与之前仅会实例化 10 - 20 个子视图的预测真是大相径庭。是什么影响了 List 对视图的优化逻辑?

在进一步排除掉 ScrollViewReader 的影响后,所有的迹象都表明用于给 scrollTo 定位的 id 修饰符可能是导致延迟的罪魁祸首。

在将 .id(item.objectID) 注释掉后,进入列表视图的卡顿立刻消失了,List 对子视图的实例化数量也完全同我们最初的预测一致。

itemRow<em>withoutID</em>2022<em>04</em>23.2022-04-23 17<em>01</em>05

现在摆在我们面前有两个问题:

  • 为什么使用了 id 修饰符的视图会提前实例化呢?
  • 不使用 .id(item.objectID) ,我们还有什么方法为列表两端定位?

id 修饰符与视图的显式标识

想搞清楚为什么使用了 id 修饰符的视图会提前实例化,我们首先需要了解 id 修饰符的作用。

标识( Identity )是 SwiftUI 在程序的多次更新中识别相同或不同元素的手段,是 SwiftUI 理解你 app 的关键。标识为随时间推移而变化的视图值提供了一个坚固的锚,它应该是稳定且唯一的。

在 SwiftUI 应用代码中,绝大多数的视图标识都是通过结构性标识 (有关结构性标识的内容可以参阅 ViewBuilder 研究(下) —— 从模仿中学习)来实现的 —— 通过视图层次结构(视图树)中的视图类型和具体位置来区分视图。但在某些情况下,我们需要使用显式标识( Explicit identity )的方式来帮助 SwiftUI 辨认视图。

在 SwiftUI 中为视图设置显式标识目前有两种方式:

  • 在 ForEach 的构造方法中指定

由于 ForEach 中的视图数量是动态的且是在运行时生成的,因此需要在 ForEach 的构造方法中指定可用来标识子视图的 KeyPath 。在我们的当前的例子中,通过将 Item 声明为符合 Identifiable 协议,从而实现了在 ForEach 中进行了默认指定。

extension Item: Identifiable {}
// NSManagedObject 是 NSObject 的子类。NSObject 为 Identifiable 提供了默认实现
ForEach(items) { item in ... }
// 相当于
ForEach(items, id:\.id) { item in ... }
  • 通过 id 修饰符指定

id 修饰符是另一个对视图进行显式标识的方式。通过它,开发者可以使用任何符合 Hashable 协议的值为视图设置显式标识。ScrollViewProxy 的 scrollTo 方法就是通过该值来找到对应的视图。另外如果 id 的标识值发生变化,SwiftUI 将丢弃原视图(生命周期终止及重置状态)并重新创建新的视图。

当仅通过 ForEach 来指定显示标识时,List 会对这些视图的显示进行优化,仅在需要显示时才会对其进行实例化。但一旦为这些子视图添加了 id 修饰符,这些视图将无法享受到 List 提供的优化能力 ( List 只会对 ForEach 中的内容进行优化)。

id 修饰符标识是通过 IDViewList 对显式标识视图进行跟踪、管理和缓存,它与 ForEach 的标识处理机制完全不同。使用了 id 修饰符相当于将这些视图从 ForEach 中拆分出来,因此丧失了优化条件。

总之,当前在数据量较大的情况下,应避免在 List 中对 ForEach 的子视图使用 id 修饰符

虽然我们已经找到了导致进入列表视图卡顿的原因,但如何在不影响效率的情况下通过 scrollTo 来实现到列表端点的滚动呢?

解决方案一

从 iOS 15 开始,SwiftUI 为 List 添加了更多的定制选项,尤其是解除了对列表行分割线设置的屏蔽且添加了官方的实现。我们可以通过在 ForEach 的外面分别为列表端点设置显式标识来解决使用 scrollTo 滚动到指定位置的问题。

对 ListEachRowHasID 进行如下修改:

struct ListEachRowHasID: View {
    @FetchRequest(
        sortDescriptors: [NSSortDescriptor(keyPath: \Item.timestamp, ascending: true)],
        animation: .default
    )
    private var items: FetchedResults<Item>

    @FetchRequest(fetchRequest: Item.fetchRequest1, animation: .default)
    var items1:FetchedResults<Item>

    init(){
        print("init")
    }

    var body: some View {
        ScrollViewReader { proxy in
            VStack {
                HStack {
                    Button("Top") {
                        withAnimation {
                            proxy.scrollTo("top", anchor: .center)
                        }
                    }.buttonStyle(.bordered)
                    Button("Bottom") {
                        withAnimation {
                            proxy.scrollTo("bottom")
                        }
                    }.buttonStyle(.bordered)
                }
                List {
                    // List 中不在 ForEach 中的视图不享受优化,无论显示与否都会提前实例化
                    TopCell()
                        .id("top")
                        // 隐藏两端视图的列表分割线
                        .listRowSeparator(.hidden)
                    ForEach(items) { item in
                        ItemRow(item: item)
                    }
                    BottomCell()
                        .id("bottom")
                        .listRowSeparator(.hidden)
                }
                // 设置最小行高,隐藏列表两端的视图
                .environment(\.defaultMinListRowHeight, 0)
            }
        }
    }
}

struct TopCell: View {
    init() { print("top cell init") } 
    var body: some View {
        Text("Top")
            .frame(width: 0, height: 0) // 隐藏两端视图
    }
}

struct BottomCell: View {
    init() { print("bottom cell init") }  // 仅两端的视图会被提前实例化,其他的视图仅在需要时进行实例化
    var body: some View {
        Text("Bottom")
            .frame(width: 0, height: 0)
    }
}

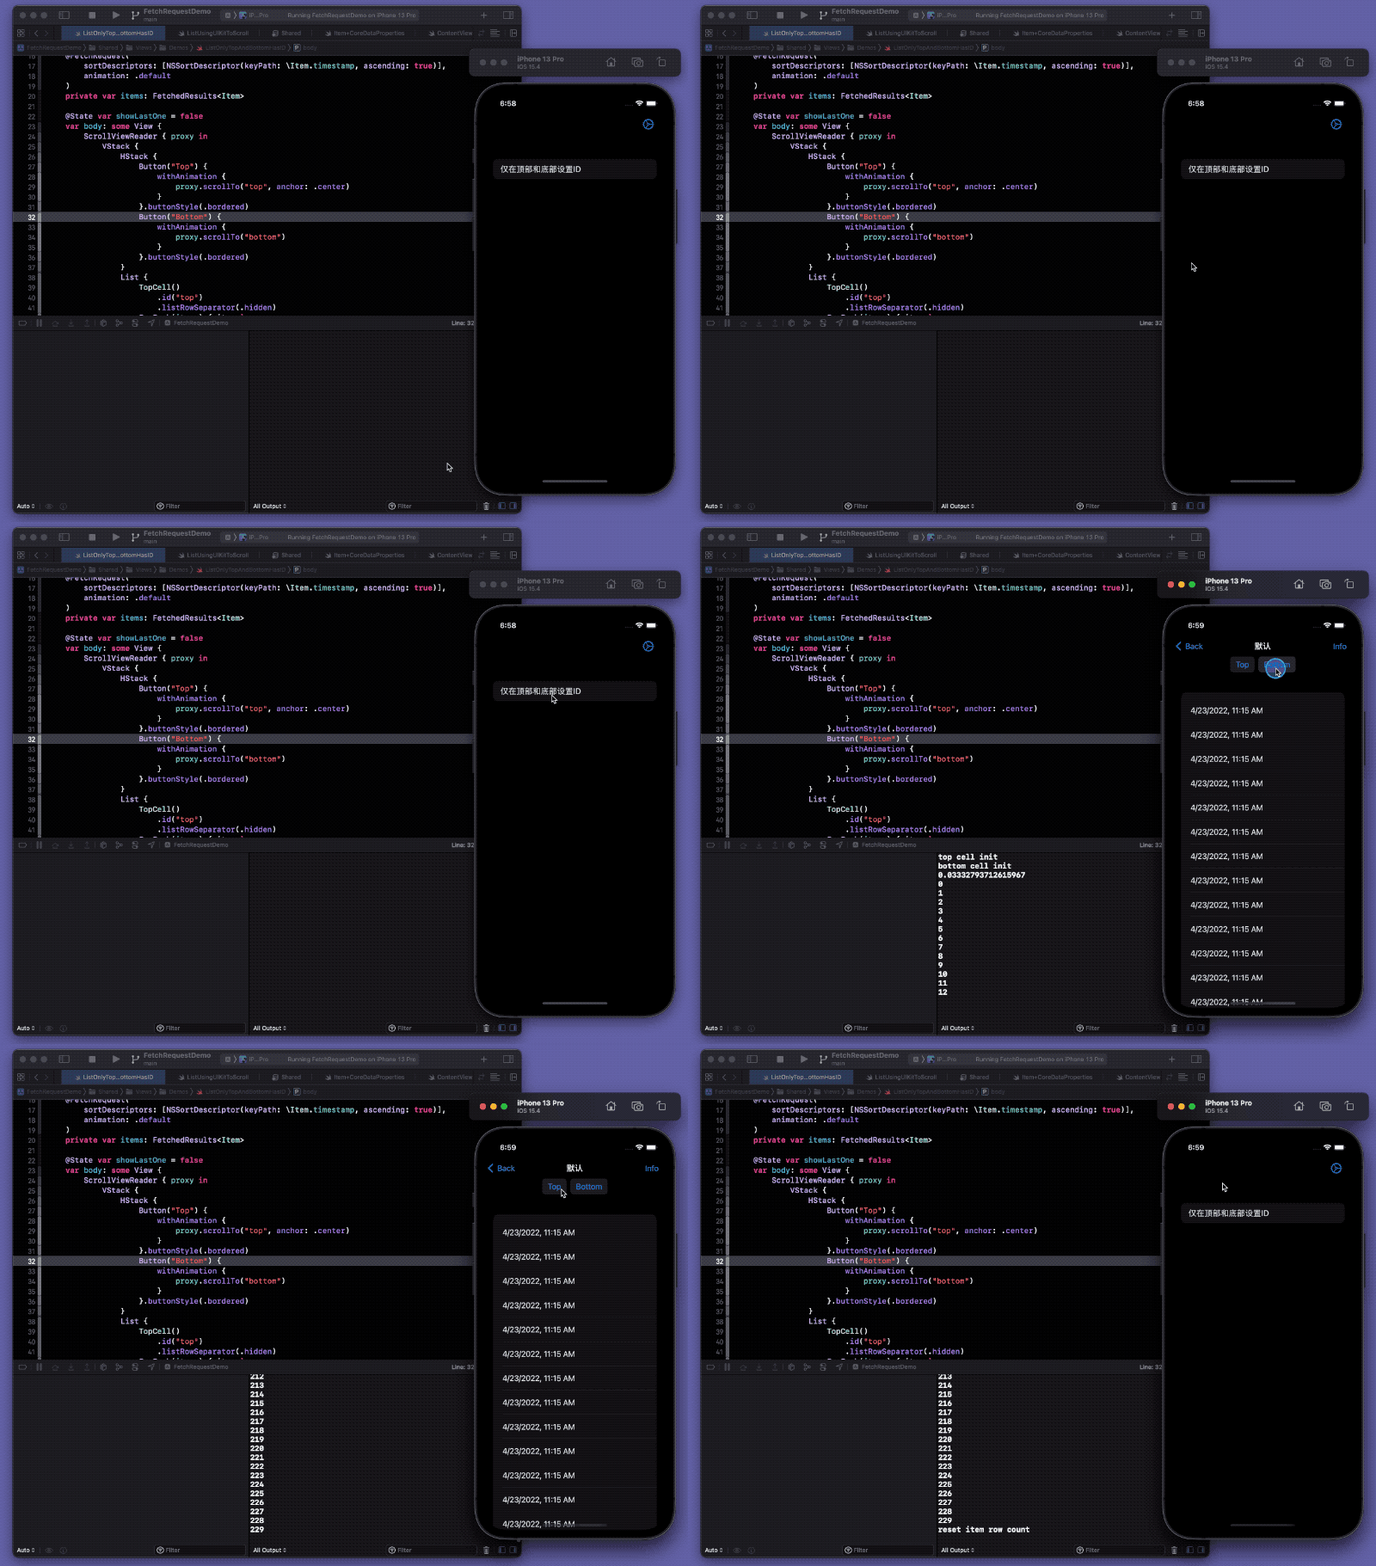
运行修改后的代码结果如下:

onlyTopAndBottomWithID<em>2022-04-23</em>18.58.53.2022-04-23 19<em>02</em>53

目前我们已经可以秒进列表视图,并实现了通过 scrollTo 滚动到指定的位置。

由于 id 修饰符并非惰性修饰符( Inert modifier ),因此我们无法在 ForEach 中仅为列表的头尾数据使用 id 修饰符。如果你尝试通过 if 语句的方式利用判断来添加 id 修饰符,将进一步劣化性能(可在 ViewBuilder 研究(下) —— 从模仿中学习)中找到原因 )。范例代码 中也提供了这种实现方式,大家可以自行比对。

新的问题

细心的朋友应该可以注意到,运行解决方案一的代码后,在第一次点击 bottom 按钮时,大概率会出现延迟情况(并不会立即开始滚动)。

scrollToBottomDelay<em>2022-04-24</em>07.40.24.2022-04-24 07<em>42</em>06

从控制台的打印信息可以得知,通过 scrollTo 滚动到指定的位置,List 会对滚动过程进行优化。通过对视觉的欺骗,仅需实例化少量的子视图即可完成滚动动画(同最初的预计一致),从而提高效率。

由于整个的滚动过程中仅实例化并绘制了 100 多个子视图,对系统的压力并不大,因此在经过反复测试后,首次点击 bottom 按钮会延迟滚动的问题大概率为当前 ScrollViewProxy 的 Bug 所致。

解决方案二

在认识到 ScrollViewProxy 以及在 ForEach 中使用 id 修饰符两者的异常表现后,我们只能尝试通过调用底层的方式来获得更加完美的效果。

除非没有其他选择,否则我并不推荐大家对 UIKit ( AppKit ) 控件进行重新包装,应使用尽可能微小的侵入方式对 SwiftUI 的原生控件进行补充和完善。

我们将通过 SwiftUI-Introspect 来实现在 List 中滚动到列表两端。

import Introspect
import SwiftUI
import UIKit

struct ListUsingUIKitToScroll: View {
    @FetchRequest(
        sortDescriptors: [NSSortDescriptor(keyPath: \Item.timestamp, ascending: true)],
        animation: .default
    )
    private var items: FetchedResults<Item>
    @State var tableView: UITableView?
    var body: some View {
        VStack {
            HStack {
                Button("Top") {
                    // 使用 UITableView 的 scrollToRow 替代 ScrollViewReader 的 scrollTo
                    self.tableView?.scrollToRow(at: IndexPath(item: 0, section: 0), at: .middle, animated: true)
                }.buttonStyle(.bordered)
                Button("Bottom") {
                    self.tableView?.scrollToRow(at: IndexPath(item: items.count - 1, section: 0), at: .bottom, animated: true)
                }.buttonStyle(.bordered)
            }
            List {
                // 无需使用 id 修饰符进行标识定位
                ForEach(items) { item in
                    ItemRow(item: item)
                }
            }
            .introspectTableView(customize: {
                // 获取 List 对应的 UITableView 实例
                self.tableView = $0
            })
        }
    }
}

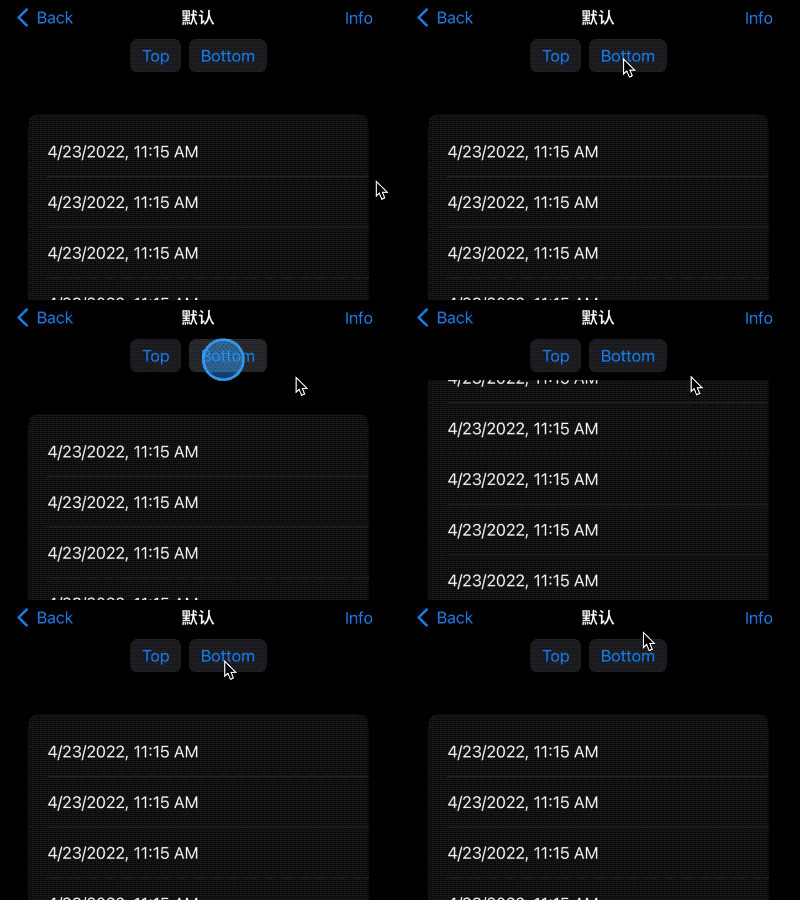
至此我们已经实现了无延迟的进入列表视图,并在首次滚动到列表底部时也没有延迟。

scrollByUITableView<em>2022-04-23</em>19.44.26.2022-04-23 19<em>46</em>20

希望 SwiftUI 在之后的版本中能够改善上面的性能问题,这样就可以无需使用非原生方法也能达成好的效果。

范例代码还提供了使用 @SectionedFetchRequest 和 section 进行定位的例子。

生产中的处理方式

本文为了演示 id 修饰符在 ForEach 中的异常状况以及问题排查思路,创建了一个在生产环境中几乎不可能使用的范例。如果在正式开发中面对需要在 List 中使用大量数据的情况,我们或许可以考虑下述的几种解决思路( 以数据采用 Core Data 存储为例 ):

数据分页

将数据分割成若干页面是处理大数据集的常用方法,Core Data 对此也提供了足够的支持。

fetchRequest.fetchBatchSize = 50 
fetchRequest.returnsObjectsAsFaults = true // 如每页数据较少,可直接对其进行惰值填充,进一步提高效率
fetchRequest.fetchLimit = 50 // 每页所需数据量
fetchRequest.fetchOffset = 0 // 逐页变换  count * pageNumber

通过使用类似上面的代码,我们可以逐页获取到所需数据,极大地减轻了系统的负担。

升降序切换

对数据进行降序显示且仅允许使用者手工滚动列表。系统中的邮件、备忘录等应用均采用此种方式。

由于用户滚动列表的速度并不算快,所以对于 List 来说压力并不算大,系统将有足够的时间构建视图。

对于拥有复杂结构子视图(尺寸不一致、图文混排)的 List 来说,在数据量大的情况下,任何的大跨度滚动( 例如直接滚动到列表底部 )都会给 List 造成巨大的布局压力,有不小的滚动失败的概率。如果必须给用户提供直接访问两端数据的方式,动态切换 SortDescriptors 或许是更好的选择。

@FetchRequest(
        sortDescriptors: [NSSortDescriptor(keyPath: \Item.timestamp, ascending: true)],
        animation: .default
    )
private var items: FetchedResults<Item>

// 在视图中切换 SortDescriptors
$items.wrappedValue.sortDescriptors = [SortDescriptor(\Item.timestamp,order: .reverse)]

增量读取

通讯类软件(比如微信)往往采用初期仅显示部分最新数据,向上滚动后采用增量获取数据的方式来减轻系统压力。

  • 不使用 @FetchRequest 或 NSFetchResultController 等动态管理方式,用数组来持有数据
  • 通过设置 NSPredicate 、NSSortDescription 和 fetchRequest.fetchLimit获取若干最新数据,将数据逆向添加入数组
  • 在列表显示后率先移动到最底端(取消动画)
  • 通过 refreshable 调用下一批数据,并继续逆向添加入数组

用类似的思路,还可以实现向下增量读取或者两端增量读取。

Link:

Linux统计文件夹下的文件数目

Linux下有三个命令:lsgrepwc。通过这三个命令的组合可以统计目录下文件及文件夹的个数。

  • 统计当前目录下文件的个数(不包括目录)
$ ls -l | grep "^-" | wc -l
  • 统计当前目录下文件的个数(包括子目录)
$ ls -lR| grep "^-" | wc -l
  • 查看某目录下文件夹(目录)的个数(包括子目录)
$ ls -lR | grep "^d" | wc -l

命令解析:

  • ls -l

长列表输出该目录下文件信息(注意这里的文件是指目录、链接、设备文件等),每一行对应一个文件或目录,ls -lR是列出所有文件,包括子目录。

  • grep "^-"
    过滤ls的输出信息,只保留一般文件,只保留目录是grep "^d"
  • wc -l
    统计输出信息的行数,统计结果就是输出信息的行数,一行信息对应一个文件,所以就是文件的个数。

Link:

How To Upgrade To PHP7.4-FPM in Ubuntu 16.04/18.04

This will upgrade your php version to php7.4-fpm when using Nginx web server.

Check your PHP version:

$ php -v

1. Install PHP 7.4

$ sudo apt install php7.4-fpm

2. Install additional modules

$ sudo apt install php7.4-common php7.4-mysql php7.4-xml php7.4-xmlrpc php7.4-curl php7.4-gd php7.4-imagick php7.4-cli php7.4-dev php7.4-imap php7.4-mbstring php7.4-opcache php7.4-soap php7.4-zip php7.4-intl -y

3. Update config files

Open the file located at /etc/php/7.4/fpm/pool.d/www.conf:

$ sudo nano /etc/php/7.4/fpm/pool.d/www.conf

Find the lines below:

;env[HOSTNAME] = $HOSTNAME
;env[PATH] = /usr/local/bin:/usr/bin:/bin
;env[TMP] = /tmp
;env[TMPDIR] = /tmp
;env[TEMP] = /tmp

and delete the semi-colons so that it looks like this:

env[HOSTNAME] = $HOSTNAME
env[PATH] = /usr/local/bin:/usr/bin:/bin
env[TMP] = /tmp
env[TMPDIR] = /tmp
env[TEMP] = /tmp

Ctrl+x to exit, then ‘Y' to save and exit.

Then, open the file located at /etc/php/7.4/fpm/php.ini:

$ sudo nano /etc/php/7.4/fpm/php.ini

find (Ctrl+w) and change the following to your desired settings:

max_execution_time = 300
memory_limit = 512M
post_max_size = 100M
upload_max_filesize = 100M

and find the line:

;cgi.fix_pathinfo=1

and delete the semicolon and set to 0:

cgi.fix_pathinfo=0

Ctrl+x to exit, then ‘Y' to save and exit.

3. Web server configuration

Make sure that your web server correctly uses the PHP 7.4 sockets/modules. Edit your nginx config to change the socket paths (substituting ‘nginx_vhost' with your correct filename, i.e. ‘default'):

$ sudo nano /etc/nginx/sites-available/nginx_vhost

For example, change the lines below from php7.3 to php7.4:

...
fastcgi_pass unix:/run/php/php7.4-fpm.sock;
...

Ctrl+x, then ‘y' to save and exit. Restart PHP and Nginx:

$ sudo systemctl restart php7.4-fpm
$ sudo service nginx restart

4. Change the default PHP version

If you have multiple PHP versions installed on your Ubuntu server, you can set PHP 7.2 as the default:

$ sudo update-alternatives --set php /usr/bin/php7.4

Link:

MacOS系统的开机启动整理

缘由:

简单整理一下macOS系统开机启动的相关知识,方便以后有需要的时候参考。

正文:

参考解答:
为什么要关心MACOS系统的启动项?
  • 为了方便使用,我们希望某些软件在开机(登录)后自动启动,比如 mysql 服务;
  • 为了减少资源占用以及出于安全考虑,还有一些默认开机(登录)后启动的软件我们不想让它自动启动,很多不常用的软件以及我们没想到的程序。
LAUNCHD 是什么?
Wikipedia defines launchd as "a unified, open-source service management framework for starting, stopping and managing daemons, applications, processes, and scripts. Written and designed by Dave Zarzycki at Apple, it was introduced with Mac OS X Tiger and is licensed under the Apache License."

根据上面的描述可以认为launchd是一套统一的开源服务管理框架,它用于启动、停止以及管理后台程序、应用程序、进程和脚本。它是由Apple开发的,并在 Mac OS X Tiger 操作系统上第一次被引入,并基于 Apache License 进行授权。

launchd 是macOS系统上第一个启动的进程,该进程(/sbin/launchd)的PID为1,整个系统的其他进程都是它创建的。当launchd启动后,它会扫描 /System/Library/LaunchDaemons 和 /Library/LaunchDaemons 中的plist文件并加载他们;当输入密码登录系统后,launchd会扫描 /System/Library/LaunchdAgents、/Library/LaunchAgents、~/Library/LaunchAgents 这三个目录中的plist文件并加载它们。

LAUNCHAGENTS 和 LAUNCHDAEMONS 的异同

守护进程(Daemon)是在后台运行的程序,不需要用户输入。例如,典型的守护进程一般用于执行日常维护任务或在有设备连入时进行恶意软件扫描。(A daemon is a program running in the background without requiring user input. A typical daemon might for instance perform daily maintenance tasks or scan a device for malware when it is connected.)

一句话描述就是——对于launchd来说,Agent和Daemon的主要区别在于代理(Agent)是以当前登录用户的权限运行的,而守护进程(Daemon)是以root或通过UserName键指定的用户权限运行的。

当电脑开机,macOS系统启动后,守护进程(Daemon)就会启动;而代理(Agent)只有在用户输入密码,登录系统的图形化界面后才会启动。

不同位置的 LaunchAgents 和 LaunchDaemons 的异同:

  • ~/Library/LaunchAgents #用户agents,以当前登录用户的身份运行
  • /Library/LaunchAgents #全局agents,以当前登录用户的身份运行
  • /Library/LaunchDaemons #全局daemons,以root或指定用户的身份运行
  • /System/Library/LaunchAgents #【不要自己擅自改动的】系统agents,以当前登录用户的身份运行
  • /System/Library/LaunchDaemons #【不要自己擅自改动的】系统daemons,以root或指定用户的身份运行
PLIST文件简单说明

launchd 是通过以“.plist”后缀结尾的xml⽂件来指定⼀个 agent/daemon 的行为,我们⼀般称它为plist⽂件。根据 plist文件 存放位置的不同,我们会分别将它们视为 agent 或 daemon 。

每个plist文件都是一个任务,加载不代表立即运行,只有设置了 RunAtLoad 为true或 keepAlive 为true时,才会加载并同时启动这些任务。

下面以brew提供的 mysql.plist 文件为例学习一下「.plist文件」的编写方法:

$ cat ~/Library/LaunchAgents/homebrew.mxcl.mysql.plist
<?xml version="1.0" encoding="UTF-8"?>
<!DOCTYPE plist PUBLIC "-//Apple//DTD PLIST 1.0//EN" "http://www.apple.com/DTDs/PropertyList-1.0.dtd">
<plist version="1.0">
<dict>
  <key>KeepAlive</key> //这个key表明你的daemon是按需启动还是需要一直运行
  <true/>
  <key>Label</key> //必须要有的key,下面的<string>为key对应的值,需要是唯一可辨识的
  <string>homebrew.mxcl.mysql</string>
  <key>ProgramArguments</key> //必须要有的key,下面的<array>为命令的路径和启动所需要的选项
  <array>
    <string>/usr/local/opt/mysql/bin/mysqld_safe</string>
    <string>--bind-address=127.0.0.1</string>
    <string>--datadir=/usr/local/var/mysql</string>
  </array>
  <key>RunAtLoad</key> //在被加载时运行
  <true/>
  <key>WorkingDirectory</key> //官方文档推荐使用 WorkingDirectory 这个key来指定工作目录
  <string>/usr/local/var/mysql</string>
</dict>
</plist>

根据文档来看,一个 plist文件 至少有 3 个关键的key需要指定:

  • Label #理论上在daemon或agent范围内部需要分别唯一可识别,但建议全局唯一
  • Program/ProgramArguments #指定要运行的程序和启动所需要的选项,建议直接用 ProgramArguments 就行
  • RunAtLoad #它决定程序是否在plist文件被加载时就运行

还有 1 个对于需要长期运行的daemon来说很关键的key是:

  • KeepAlive #它表明你的daemon是按需启动还是需要一直运行,为true则表示一直运行

其它的就很简单了,照着已有示例改改就能用。

加载 和 启动 PLIST文件 的区别

加载一个plist文件并不一定意味着启动plist文件中指定的程序。程序何时启动由plist文件中的设置决定。事实上,只有当指定了 RunAtLoad 或 KeepAlive 时,launchd才会在加载plist文件后无条件地启动指定的程序。(Loading a job definition does not necessarily mean to start the job. When a job is started is determined by the job definition. In fact, only when RunAtLoad or KeepAlive have been specified,launchd will start the job unconditionally when it has been loaded.)

LAUNCHCTL 的使用

列出所有由launchd管理的进程

launchctl list
launchctl list | grep 'keyword'

手动加载某个 .plist 文件:

launchctl load ~/Library/LaunchAgents/homebrew.mxcl.mysql.plist
# -w选项的作用是,如果该服务被禁用了,则会在加载的同时设置为启用
launchctl load -w ~/Library/LaunchAgents/homebrew.mxcl.mysql.plist

加载/卸载/启动/停止/移除/启用/停用/……

launchctl load|unload|start|stop|remove|enable|disable|... /path/to/name.plist

检查某个 .plist 文件的语法/格式是否正确:

plutil -lint ~/Library/LaunchAgents/homebrew.mxcl.mysql.plist
# launchctl help
# launchctl load --help


Usage: launchctl <subcommand> ... | help [subcommand]
Many subcommands take a target specifier that refers to a domain or service
within that domain. The available specifier forms are:

system/[service-name]
Targets the system-wide domain or service within. Root privileges are required
to make modifications.

user/<uid>/[service-name]
Targets the user domain or service within. A process running as the target user
may make modifications. Root may modify any user's domain. User domains do not
exist on iOS.

gui/<uid>/[service-name]
Targets the GUI domain or service within. Each GUI domain is associated with a
user domain, and a process running as the owner of that user domain may make
modifications. Root may modify any GUI domain. GUI domains do not exist on iOS.

session/<asid>/[service-name]
Targets a session domain or service within. A process running within the target
security audit session may make modifications. Root may modify any session
domain.

pid/<pid>/[service-name]
Targets a process domain or service within. Only the process which owns the
domain may modify it. Even root may not do so.

When using a legacy subcommand which manipulates a domain, the target domain is
inferred from the current execution context. When run as root (whether it is
via a root shell or sudo(1)), the target domain is assumed to be the
system-wide domain. When run from a normal user's shell, the target is assumed
to be the per-user domain for that current user.

Subcommands:
...    
    enable          Enables an existing service.
    disable         Disables an existing service.
    kickstart       Forces an existing service to start.
...    
    kill            Sends a signal to the service instance.
...    
    runstats        Prints performance statistics for a service.
...    
    load            Recommended alternatives: bootstrap | enable. Bootstraps a service or directory of services.
    unload          Recommended alternatives: bootout | disable. Unloads a service or directory of services.
    remove          Unloads the specified service name.
    list            Lists information about services.
    start           Starts the specified service.
    stop            Stops the specified service if it is running.
...    
参考链接:

Mac上有些软件无法禁止开机启动怎么办?

MacOS:Launchd&LaunchDaemon&LaunchAgent&.plist文件编写

What is launchd?

Mac服务管理 – launchd、launchctl、LaunchAgent、LaunchDaemon、brew services详解

了解LaunchDaemons

【知识】管理 macOS 的启动项

macOS开机启动项设置

苹果全新版本macOS Ventura操作系统 macOS Ventura新功能

What are the differences between LaunchAgents and LaunchDaemons?

https://ss64.com/osx/launchctl.html

macOS: Know the difference between launch agents and daemons, and use them to automate processes

How to Catch and Remove Hidden LaunchDaemons and LaunchAgents on Mac

Creating Launch Daemons and Agents

Link:

Git 文件名为中文显示乱码处理

如果在你的项目下有许多中文文件名的文件,当你编辑某些后通过git status查看状态时会发现那些中文文件名的文件会显示成\345\267\245\344,这样一来你就不知道你到底编辑了哪些文件。 网上有人说是编码问题,修改编码为GB2312或GBK,尝试了一下是不可行的。也有人说配置core.quotepath,按照这个配置确实是可行的。

局部配置

如果想要显示成中文,则需要对git做一些配置,可以输入命令(适合所有平台):

git config core.quotepath false

此时可以查看当前项目根目录下的.git/config文件,在[core]下面多了一项配置quotepath = false。不过这个配置方法只是针对当前git项目有效,如果切换到其他项目。

也可以直接在.git/config文件中添加quotepath = false

全局配置

如果你不想在每个项目都像上面那样配置,你也可以做一个全局配置。有人说通过命令:

git config --global core.quotepath false

就可以进行全局配置,但尝试后实际上是不可行的(Windows下不行)。于是我想到的一个办法就是在git全局配置文件中进行配置,方法就类似配置.git/config文件。

找到当前系统的用户根目录下的.gitconfig文件,在配置中添加:

[core]
    quotepath = false
.gitconfig`所在路径,Windows下:`C:\Users\用户名`,Linux下:`/home/用户名`或执行命令`cd ~

注意问题

当前git项目下.git/config中的配置会覆盖全局的配置,所以当.git/config中配置了quotepath = true,全局配置了quotepath = false,查看中文文件依然还是乱码,必须需要将.git/config中的quotepath删掉或者设为false

Link:

Mac 进程杀死不了如何解决

问题描述与解决

之前装了一个程序(GlobalProtect), 这个程序的图标一直显示在状态栏(如下图), 之后程序不需要使用就是就想把它该程序的进程kill调。

收获与总结

总结出以下知识:

(1)/Library/LaunchDaemons , (2)/Library/LaunchAgents ,(3) ~/Library/LaunchAgents 这三个目录下*.plist 文件所引用的程序会按照某种规则(定义在.plist文件中)自动重启。(1)下的程序boot完就会启动,(2)下是登入系统才会启动,(3)是特定用户登录才会启动。

举个例子如下图, 表示每周五18时10分,会启动Java Updater。所以一般都会在周五提示更新JDK.

Link:

Mac电脑删除软件时提示“不能完成此操作,xxx已锁定”的解决方案

Mac 上安装的软件,左下角有个锁的小图标,拖动文件进行删除时提示 不能完成此操作,xxx已锁定,使用命令行强制删除 sudo rm -rf xxx.app 提示:Operation not permitted。通过以下方式可以正常解锁文件,然后进行正常删除操作:

1. /bin/ls -dleO@ 你APP的路径(可以直接从应用管理里面拖进来)
然后回车,会发现接下来打印了 drwxr-xr-x  3 root  admin  96 10 21 19:33  你APP的路径
 
2. sudo /usr/bin/chflags -R noschg 你APP的路径
然后输入密码,然后发现 应用被解锁了,然后就可以按照常规方法删除啦

Link: